My Incubator: Little Giant Still Air 9200

As a first timer I chose a relatively inexpensive incubator with large viewing windows. This model is a still air incubator, which meant that I had to monitor the temp and humidity levels much more closely than I would have had to had I been using a forced air incubator. I also opted NOT to get an automatic egg turn because I wanted my children to have the hands on experience of turning the eggs, and I knew I would be available to turn the eggs and monitor the incubator for the next 28 days. If you are not available to turn your eggs a minimum of 3x per day and check the temp and humidity periodically, you will need a fully automatic forced air incubator.
My Egg Log
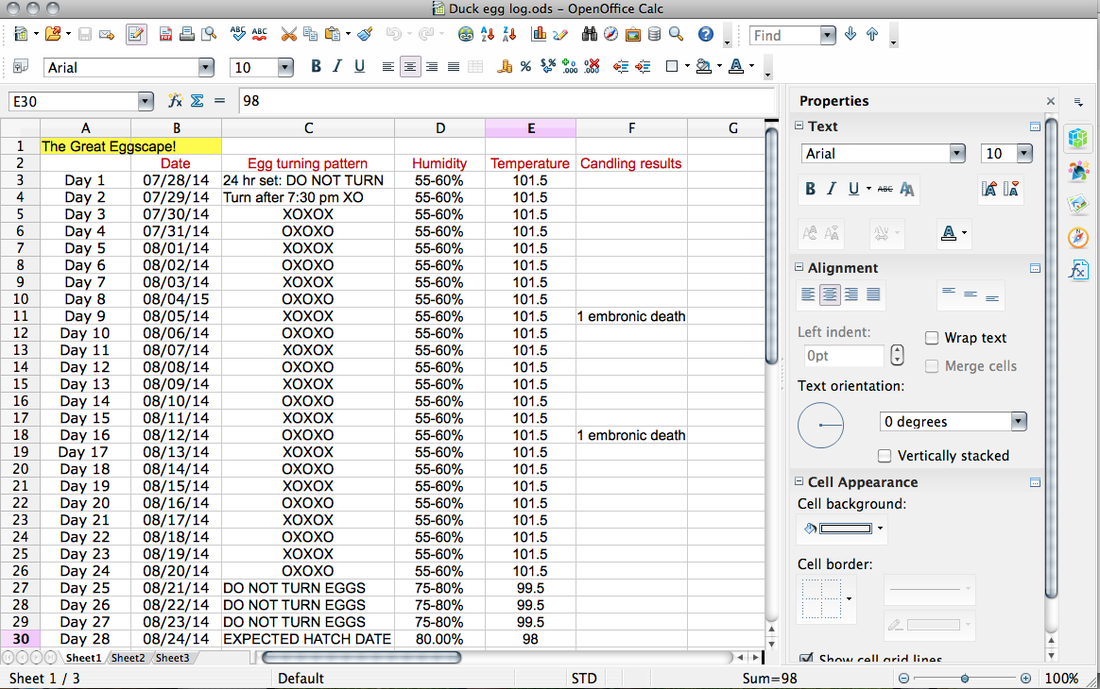
As the chart shows, duck eggs require 28 days of incubation. I started with 7 duck eggs which I brought home after I had insured that my incubator had stabilized, and was maintaining a constant temp of 101.5. Still air models require a slightly higher temp then forced air models which should be kept at 99.5 up until the last 3 days of incubation. The eggs must first be set for a full 24 hours in the incubator. During the set which is counted as day one, the eggs must NOT be turned, and the temperature should not be adjusted. Another reason I did not use an automatic egg turner was because duck eggs tend to do better without them. However, if using an automatic turner, it is crucial to place the eggs with the pointed end down so that the large end which contains their air sac faces upward. Eggs must be turned a minimum of 3x per day. It is important to always turn them an odd number of times per day so that a different side of the egg faces up each night. I penciled an X and an O on the opposite side of the eggs to ensure that I turned them correctly. My eggs were turned 5x a day. I stopped turning the eggs on the night of day 25.
Egg Candling
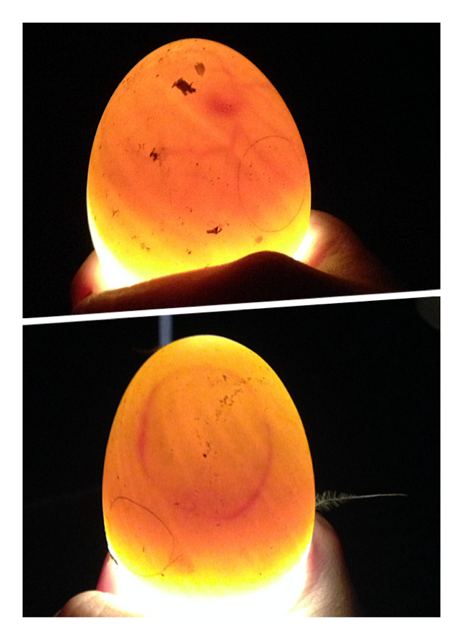
Egg candling involves shining a light into the eggs to check for fertility, bad eggs, and air cell growth. Air cell growth should be marked with a pencil at each candling. I candled my eggs by shining a flashlight into the bottom of them while in a dark room. I candled on day 9 as well as on day 16. The top image depicts a healthy embryo. The prominent blood vessels are clear and the dark spot is the developing chick. The bottom image shows a blood ring, a tell tale sign of early embryonic death. Later deaths are a bit harder to distinguish but the most obvious sign is a very foul smell, and lack of blood vessels. If you are unsure if a death has occurred, and the egg does NOT smell leave it be! (I made ONE terrible misdiagnosis at the 9 day candling, and was beyond horrified to discover I had accidentally killed an embryo). It is important to remove eggs that you are positive have went bad due to the risk of them exploding and contaminating the healthy eggs with bacteria! Some people choose to candle their eggs at day 25 but since I could see my eggs wiggling I knew they were all still alive.
Lockdown
Lockdown refers to the last 3 days of incubation, days 26, 27, and 28, During lockdown you should not turn the eggs at all because the ducklings are orienting themselves to the correct hatching position. During this time the humidity should be increased to 75-80% and the temp should be lowered by 1 degree.
The Hatch
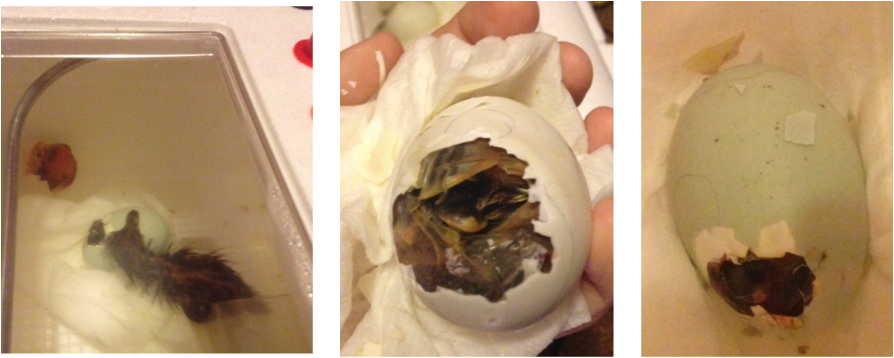
By lockdown I had 4 remaining eggs. Three eggs pipped on the morning of day 26. "Pipping" refers to the 1st poke in the the shell. Their 1st pips cracked the shell but did not penetrate all the way through the shell. I knew that with 24hours their bills should break through the hole completely to allow air in, and slightly enlarge the hole. Well, a day later there was no progress which meant that they were running out of air in there. I was particularly concerned about one egg who had pipped into the wrong end of its shell because I knew that meant that the duckling had not been able to access it's air cell as the other ducklings had. Looking through the incubator I noticed that the exposed outer membrane underneath the shell had begun to turn brown because it had dried out. I spritzed the membrane with a bit of warm water with the hope that the ducklings would be able to break through the softened membrane on their own. I waited 6 more hours and upon checking them again I found that no progression had been made and I couldn't hear them pecking as much. At that point I realized my options were to assist, or let them die. I made the decision to attempt to perform an assisted hatch.
The Assisted Hatch: C-Section Ducklings!
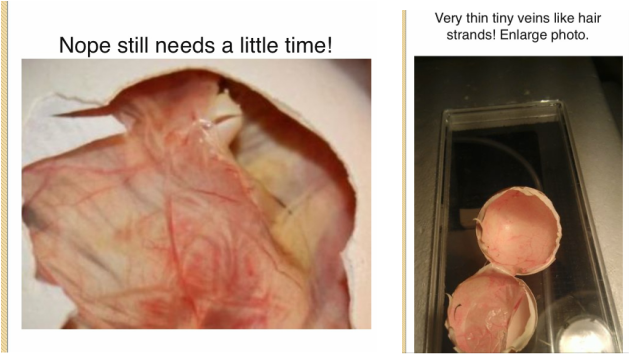
After doing a lot of reading, and watching some YouTube videos I was confident enough to begin. My goal was assist as minimally as possible because more harm then good can be done, and it is VERY easy to accidentally kill them. Beneath the shell there are an inner and an outer membrane. The outer membrane is white and the inner membrane is clear. The inner membrane holds all of the chicks blood vessels. Before it hatches the blood in the vessels recede into its body, and it absorbs it's yolk sack. I started by using a pair of tweezers to chip off a small piece of shell, and peel back the white outer membrane. I then gently wet the inner membrane with warm water so that I could see if the blood vessels had receded. At that point they had NOT, but the ducklings needed air, so while following an assisted hatching guide I VERY carefully made a slight hole in the inner membrane where the tip of the beak was. This was extremely challenging because I had to weave the tweezers between blood vessels while the duckling was squirming. Nicking a blood vessel would have caused the duckling to bleed out, but no intervention would have meant suffocation. After I had successfully given them each an air hole, I waited to see if they would progress on their own. 5 hours later and nothing had changed which I knew wasn't good. I again wet the inner membrane to check for receding blood vessels and 2 out of 3 eggs were ready. I picked off a bit more shell and peeled back both membranes. About half of the shell was removed. Within an hour those 2 ducklings kicked themselves free and were happily waddling around in the incubator. I used the following images as my guide during the assisted hatch. The 1st image clearly shows that this membrane still contains prominent blood vessels, which means that the duckling has not absorbed its yolk , and the blood has NOT receded into its body. The 2nd image shows a clear membrane with TINY hair like strands, demonstrating that the duckling IS ready! It is important to NEVER get the duckling fully out of the shell during an assisted hatch. They MUST kick themselves free.
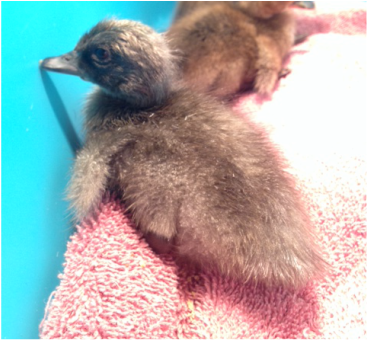
The Lucky Duck
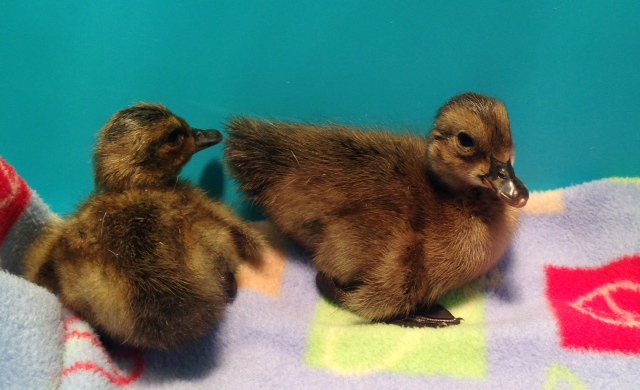
With 2 hatchlings waddling around the incubator, there were still 2 eggs left. One egg was the one who had pipped into the wrong end. whom I had already assisted a bit, and the other egg never pipped. I noticed that the egg without a pip had begun to develop a large gray patch. I assumed it was dead but decided to perform a float test to determine if it was still viable. Normally a float test should not be done until the egg is 2 days overdue, but because of the obvious gray patch this was an exception. The egg sunk which indicated it was a dud. Low floating eggs are viable and sinkers and bobber eggs are duds. The remaining duckling was in a bad situation after having been stuck at the wrong end of its shell for so long. He was so severely malpositioned that I knew he likely wouldn't be able to fully absorb his yolk. He finally emerged 12 hours later then his siblings. He did have a bit of yolk still attached to his belly button, but before I could wrap him up and give him a chance to absorbed it, he moved and it tore off himself. He was left with an open wound. Most chicks die from this this because it pretty much always gets infected. This poor little ducky was so weak and sickly. He lied in the incubator for the next 24 hours not picking up his head, or even opening his eyes. It was obvious that he was suffering, and upon noticing a bloated abdomen I knew he had an infection to which there was no treatment. I decided the humane thing to do was to put him down. My husband agreed to axe him, as I could not do the deed myself. My oldest son had dug him a grave and I placed him in a shoebox to be carried out to my husband. On my way outside he suddenly perked up! He was so lively, like nothing I had seen from him before. My gut told me to stop, so I did. I dried him off as he was still wet from being in the humid incubator, and placed him with the other ducklings. Within an hour it was clear that I made the right choice. The duckling has thrived ever since, and his belly has miraculously healed. He escaped death row and defied nature, but then again so did I by assisting the hatch! The "lucky duck" who is a Blue Indian Runner, is featured below!
Photos from the hatch!
The Other Ducklings: Golden 300 Hybrids!